Conductive Labs provides periodic updates to MRCC firmware. Follow the directions below if you need to update.
If your MRCC firmware is less than version 1.1.077, updating is mandatory.
Download the latest MRCC Firmware Update Here: MRCC_1.1.095_09-10-2025
Changes includes the following:
- Warning: this release changes the format of the MRCC’s USB Device name (if you were not already using the beta version) so it will undoubtedly mess up the naming in your DAW or MacOS Audio MIDI settings. See instructions below to clear old names from the OS so the new name(s) will be used.
Features: - Number of simultaneous routes (per patch) allowed/saved/recalled has been increased from 50 to 255.
- A number of routes counter was added to the top left corner of the Activity screen. The counter turns Red once the maximum number of routes is reached.Fixes:
- MRCC MIDI Cntrl Port won’t save when greater than P06 (P07 through P12 would revert to “-” on power cycle).
- Enhancements to MIDI buffering and SysEx message handling. For large SysEx transfers (>10k), we suggest halting other MIDI sources to remove merged data, just to be on the safe side. MRCC can process messages after a SysEx end of message (F7), but will not interrupt or mix a SysEx message with MIDI realtime messages.
Enhancements to MRCC USB Device enumeration:
- Multiple MRCCs will now be recognized as unique devices by Windows current MIDI API when each is assigned a unique name (set on MRCC Settings page 4/4). It’s allowed to leave one MRCC named the default name, or change each MRCC to have a name with a letter, e.g., MRCC-A, MRCC-B, etc.
- MRCC “PC Name” (Settings page 4/4), which allows you to select an alternate USB device name for MRCC has been reworked to prevent a race condition that caused the original name to re-appear sometimes.
- The name “MRCC” is also changed; trailing nulls were replaced by spaces. It might affect how the name appears in your software, unless you already changed the name using the “PC name” settings on Settings page 4/4. See instructions for clearing Windows USB device cache below.
- USB MIDI Virtual port names (Port 01, Port 02, etc) are now seen as Child devices of the MRCC device. Though these are not currently parsed by Windows’ MIDI API, some applications may use them (please let us know if you see an app that uses them). These port labels are used on macOS and will be used in the forthcoming “Microsoft Windows MIDI Service”.
- The USB iSerialNumber descriptor is now populated with the MRCC serial number. This helps Windows to see multiple MRCC’s as unique devices. However, the Windows MIDI API may not see MIDI devices with a common USB Manufacturer and USB Device ID as unique devices. This is slated to be fixed in “Microsoft Windows MIDI Service” when it is released.
- We have discussed these changes with the Microsoft MIDI evangelist and believe MRCC is now ready for Windows MIDI Service when it is ready.
For your OS to properly enumerate the new MRCC device name and serial number, it is necessary to follow the steps below:
Instructions for clearing the Windows USB device cache of old MRCC entries
Since the MRCC name will be cached in Windows USB cache, it is necessary to follow a procedure to get the device name(s) to update:
1. If desired, change the MRCC device name to the name of your choice, e.g., MRCC-X (it’s on MRCC Settings page 4/4), update the MRCC firmware (if you haven’t already), then turn off MRCC.
2. Download and run USBDeview as Administrator (at your own risk), or use Windows Device Manager
https://www.nirsoft.net/utils/usb_devices_view.html
3. In USBDeview, look for a “Friendly Name” label of “MRCC” (or “MRCC-X” if you have renamed it), select it, then click on the column heading ProductID to sort.
Select all 0490 ProductID entries, right click and select “Uninstall selected devices”. Check that all ProductID 0490 are gone. Go to step 4.
For Windows Device Manager, open Device Manager and click View, and select “Show hidden devices”
Expand the Sound, video and game controllers section
Find any instance of MRCC, right click it and select “Uninstall device”. Repeat for all MRCC devices in the list.
4. Shutdown (or Reboot) the PC, turn on MRCC, turn on the PC. The MRCC device name should enumerate with the new name.
MRCC Device Name instructions for OSX:
1.After updating the MRCC… Open Audio Midi Setup on mac, and with the MRCC disconnected select and delete any previous instances of MRCC devices that are present.
2. With MRCC still disconnected, if desired, enter Settings page 4/4 and select the letter that you wish to identify this MRCC with (let’s say A).
3. Power cycle the MRCC
4. Connect the MRCC to the Mac via PC (usb) port, 5. It should now show up as a new device MRCC-A
5. Disconnect and follow steps 2-4 for any other MRCCs making sure to pick a different letter for each one.
Please note that changing the MRCC-letter after it has been saved as a device in Windows or in the macOS Audio MIDI Setup will cause unpredictable behavior and will require you repeat steps 1-5 above to create a new instance.
Note: “beta” releases (and some older releases) may be found on the Conductive Labs forums. You must be a registered user and logged in to download them. Release notes for all releases are on the MRCC Open Beta Firmware forum. Going forward, new beta releases will be posted to our Discord server.
You can find your current firmware version on the MRCC power on screen, or on SETTINGS page 4.
MRCC Firmware Update Instructions:
-
-
-
- Install the Teensy Loader program
Download the Teensy Loader for Windows: https://www.pjrc.com/teensy/teensy.exe or for Mac: https://www.pjrc.com/teensy/teensy.dmg
Save it to someplace convenient where you can find it, like to the desktop.
Note: more details for using the Teensy Loader on various supported platforms (like Linux) can be found here, but don’t download any firmware from there: PJRC Teensy Loader page
- Download the latest MRCC firmware and Unzip it
Download the MRCC firmware file (link at the top of this page) and save it to your desktop or another convenient location where you can find it.
Un-zip the .hex file from the .ZIP file (that you downloaded above) to your desktop or another convenient location where you can find it. - Load the Firmware on MRCC
Connect the MRCC’s PC USB port (the USB type B connector) to your computer with the supplied USB cable.
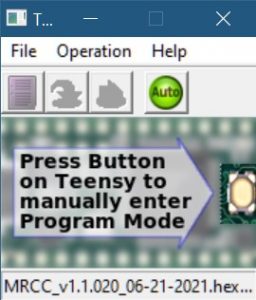
Run the Teensy Loader program by double clicking it.
- Click on File, then Open HEX File. Select the .hex file you extracted above.

- Alternatively, find the .hex file with Windows File Explorer, or on the Mac, click on the Downloads icon and choose “Open in Finder”. Then drag and drop the .hex file onto the Teensy Loader program.
- Click the green Auto button so it is lit: Then use a pen or paper clip to briefly press the recessed FW button (hole on the right-side end cap of MRCC).
- Install the Teensy Loader program
-
-

It takes about 3 seconds to program. MRCC will restart once programming is complete.
Troubleshooting:
-
-
- If you get a message that the file is too large, it typically indicates that the Teensy Loader program does not recognize the MRCC. First make sure you clicked on the green Auto button as shown above. You can ignore the error and try pressing the FW button on MRCC again to see if it will work.
- If MRCC is connected to a USB hub, connect it directly to the USB port on the computer while performing the firmware update.
- Try another USB cable. The shorter the better.
- If it still fails, the .hex file may be corrupt. Try downloading and extracting the .hex file from the ZIP file again.
-
Join our Discord server for announcements including new firmware updates and release notes. See the link on the page header.
